Introduction:
It's been a while since I started considering a project to create a video conferencing application that had both a web version and an Android application. Consequently, I'd like to outline my approach to this project, and this time, I've set some guiding principles. Specifically, for this phase, my aim is to make it entirely serverless, and I'm committed to completing it within a week. The primary objective is to rapidly build a proof of concept. This case study is going to be quite extensive because I plan to elucidate and document each step of the process, aiming to provide you with detailed explanations in each section.
In alignment with these principles, I've opted to utilize Vue JS as the framework, paired with Tailwind CSS to ensure an aesthetically pleasing interface. Additionally, I'll be integrating Google Firebase for authentication purposes and incorporating Agora.io to handle video and audio aspects. As we progress through the implementation process, I'll introduce and elucidate any other libraries we choose to incorporate.
Setting up the project:
As previously mentioned, I will be utilizing Vue JS. Assuming that you possess a fundamental understanding of Vanilla JavaScript and have Node.js successfully installed on your system. Our journey begins with the creation of the project itself.
To initiate the project, you can use the following command:
After running the command, you will be prompted to provide a project name. For my instance, I've named it "agora-video-conference." Then, for the choice of framework, select Vue. Lastly, when prompted to choose the variant, opt for "Customize with create-vue."
For the customizations here are the options I had selected:
In this context, I've specifically chosen the essentials required for this project. These include Pinia for efficient state management and Vue Router to facilitate navigation, especially as we are constructing a Single Page Application.
In the terminal, switch to the directory using the command cd agora-video-conference, and then use npm install to commence the installation of all the necessary dependencies for the current stage of the project structure.
Additionally, at this juncture, let's install Tailwind CSS by referring to the Tailwind documentation for guidance on its integration with PostCSS.
Inside the project directory, we will also create a postcss.config.js file and insert the following code:
Next, we proceed to update the contents of the tailwind.config.js file with the following:
Additionally, we will incorporate the "@tailwind" directives for each of Tailwind's layers into our primary CSS file. In our specific case, this file can be found as "main.css" within the src/assets directory of our project. I simply replaced all its content with the following:
Furthermore, we will install "tailwind forms," which is essentially a Tailwind plugin designed to offer a fundamental reset for form styles. This reset simplifies the process of customizing form elements using utility classes.
Once the plugin is installed, we will also need to include it in our tailwind.config.js.
By this juncture, we have essentially wrapped up the foundational setup necessary to initiate the coding phase of our project. However, prior to immersing ourselves in coding, it would be advantageous to develop an initial plan to enhance our workflow. Let's kick off this process by documenting a workflow for our application. This will greatly simplify the task of designing and implementing the steps as we move forward.
Workflow
- The landing page of our project doubles as the login page, serving as the entry point for users. This page will also provide options for redirection to a sign-up page.
- Upon successful authentication, users will be directed to a screen where they can input their preferred audio/video channel/room to join or create a new channel/room for others to join.
- Once a channel is joined or created, users will be automatically redirected to the channel view. This view will include features for muting/unmuting the microphone, toggling the camera on/off, leaving the channel, and signing out.
- The channel view will also display a grid of other users present in the channel. If any of them have shared their media sources, they will be visible in the grid.
- When a user chooses to exit a channel, they will be redirected to the same view as described in point 2, giving them the option to join another channel or create a new one.
- Finally, when a user logs out, they will be redirected to the authentication page mentioned in point 1, allowing them to re-enter their credentials.
The workflow is straightforward and transparent. Now, let's advance to the project implementation, beginning with the authentication phase. As mentioned earlier, we will handle authentication through Firebase, with a focus on the email and password sign-in option provided by Firebase. Our first task is to establish a Firebase project to initiate this procedure.
Authentication
2. Provide a name for the project and then click "Continue."
3. If desired, you can activate Google Analytics, then proceed to click the "Create project" button.
4. Wait for the project to finish its initialization process. Once it's prepared, click on "Continue." This action will take you to the Firebase dashboard page.
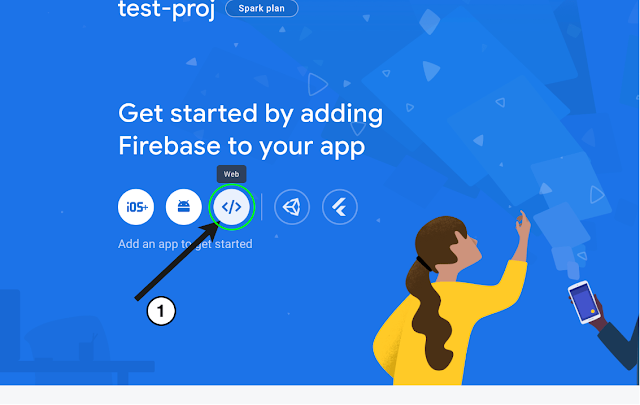
At this stage, we will collect client-side configuration/Firebase SDK credentials from the dashboard, which our app needs in order to access various functionalities on Firebase.
1. Select the web icon (as we are integrating it into a web application).
2. In this section, you will encounter a form where you can select a nickname for your web application. I chose to name mine "web-app." Once you've completed this step, you will receive all the necessary configuration details required to set up the client SDK. It's crucial to make a secure copy of these details as we will need them later during the coding phase.
While we're in this section, we will also configure our Firebase project to enable email and password sign-in.
1. From the firebase console Sidebar, choose Authentication.
2. Click on “Get Started.” and Choose the email and password option
With Firebase now set up with all the required details, we can proceed to the coding phase. Open your preferred code editor or IDE. Personally, I'll be using WebStorm, which I've become accustomed to. In my experience, JetBeans IDEs streamline the coding process, providing a user-friendly and efficient coding experience compared to other editors like VSCode. However, this is solely my opinion, and I do not harbor any negativity towards other code editors or IDEs.
As you may have already observed, Vite would have generated the necessary directory structure and a project template when we initially created the project. We will now proceed to modify the template according to our requirements. To begin, let's open the index.html file located in the src directory and add the tailwind utility class "h-full" to the body tag. This will set the container for the body to its full height.
Next, let's open the App.vue file and replace its content with the
following:
This code essentially directs the application to show content/view within the router-view component based on the current router path. Normally, this is where I would handle the base layout templates for the app. However, for this specific project, we will assume that all views will have the same base layout and therefore won't require separate handling.
Now, let's move forward with the essential steps to establish communication between our application and Firebase. To begin, we need to create a new directory named "utils" within the src directory. Inside the "utils" directory, create a JavaScript file called "firebaseConfig.js". In my projects, I typically utilize the utils directory to store all external scripts, which helps maintain a clean and organized project structure.
Before we proceed to add any content to our firebaseConfig.js file, let's install the Firebase library by running the following command in the terminal:
Once firebase is intalled you can add the
following to the firebaseConfig.js:
In this code snippet, the variable "firebaseConfig" holds the configuration details that we obtained during the second step of configuring the Firebase app for web applications on the Firebase console.
Here, we initialize the Firebase app and also intialize Firebase authentication and get a reference to the service. We then export it so that it can be imported and accessed from anywhere within our application. This allows us to utilize Firebase authentication functionalities as required throughout our app.
As you may recall, I mentioned earlier that I will be using Pinia for state management. One of the main reasons for using Pinia in this project is to manage the state of the authenticated user and their details. To accomplish this, let's create a Pinia store specifically for the user.
Start by creating a file called "userStore.js" in the "stores" sub directory within the src directory of the project. This file will contain the
following code:
.png "https://gist.github.com/eyaadh/ec65eae38282355ddbe5fa029154991c")
Let's go through the actions in this store individually and grasp their functionalities.
Firstly, we import the following Firebase methods/functions: createUserWithEmailAndPassword, onAuthStateChanged, signInWithEmailAndPassword, and signOut. These functions play a crucial role in user authentication. Additionally, we import the auth object that was previously exported.
The store also contains the following states:
- userData: This variable holds the user data, such as the email used for authentication and the UID (User ID) for the user.
- loadingUser: This variable is used to track whether the communication with Firebase to collect the data required for userData is completed or still pending.
- loadingSession: Similar to the loadingUser variable, this variable is employed by our Vue Router to authenticate the ongoing user session.
- rtcToken: This variable holds the token required to create or join voice/video channels on Agora.
- channelToJoin: This variable represents the name of the voice/video channel that the client is joining.
registerUser:
The registerUser action is triggered when a user decides to register a new username in our application. This function takes two arguments: email and password, and it returns a new promise.
This action tries to invoke the Firebase function createUserWithEmailAndPassword. If Firebase encounters an error, the promise is rejected with that error. On a successful operation, it updates the userData state with the email and UID provided by Firebase, and resolves the promise with the user object returned by Firebase.
loginUser:
The loginUser action is invoked when initiating the login process for the application. Similar to the registerUser action, this function also takes two arguments: email and password, and it returns a new promise.
This action utilizes the Firebase function signInWithEmailAndPassword. If Firebase encounters an error, the promise is rejected with that error. In the case of a successful operation, it updates the userData state with the email and UID provided by Firebase, and resolves the promise with the user object returned by Firebase.
logoutUser:
The logoutUser action is invoked when we want to log out from our application. It also returns a new promise. The action calls the Firebase function signOut, which requires the auth object that we imported. If Firebase returns an error, the promise is rejected with the error. If the logout process is successful, the promise is resolved with a true state.
currentUser:
In this action, we employ the onAuthStateChanged observer to guarantee that the Auth object remains in a stable state. If the user is in an intermediate state, it sets the userData state to null. Otherwise, it updates the uid and email of userData with the information obtained from the user object received from Firebase.
As the next step, let's create empty templates for the views that we will need in our app. We will revisit each of these templates when we are ready to code them. However, it is important to create them at this stage as we will need to reference some of them in our codebase as we progress.
In relation to the previously outlined workflow, it is necessary to generate the following views. Consequently, within the "views" sub directory in the src directory of our project, create the subsequent files:
- HomeView.vue
- LoginView.vue
- RoomView.vue
- SignUpView.vue
Next, let's configure our Vue Router to establish the navigation and its corresponding route paths. We will initiate this process by modifying the index.js file situated in the router subdirectory within the src directory of our project. Here is how my
code for router looks like:
.png)
The key highlights include our establishment of a route for each previously created view, with dynamic imports being used. The rationale behind dynamic imports addresses a common challenge in app development with a bundler, the potential expansion of the JavaScript bundle's size, which could negatively impact page loading times. It is more effective to compartmentalize components for each route into separate chunks, loading them only when the associated route is accessed. While this might not be immediately noticeable in a smaller application, maintaining a solid foundation and adhering to best practices is advisable to prevent oversights later on.
Additionally, you may have observed that specific paths are secured with navigation guards. This guard limit access to particular views exclusively when users are authenticated. In this guard, we utilize the currentUser action established in the userStore. As you may already know, if the promise for currentUser resolves with a user object from Firebase, it indicates that the user is not in an intermediate state. Consequently, we allow progression to the route; otherwise, we redirect them to the login path.
Before we proceed, it's crucial to acknowledge that, due to changes in the code base concerning our router, we are no longer exporting a default constant in the index.js file for our router, unlike the template created by Vite. Because of our modifications, this might result in issues wherever the router is imported within our application. To resolve this, let's make a straightforward adjustment in the way it is imported in the
main.js file situated in the src directory of the project. Currently, this is the sole location within the project where the router is referenced.
Now, let's direct our attention to the sign-up view. However, before we move forward, installing another library called Vuelidate is essential. This library assists in validating the data on our forms.
Here is how my
code for SignUpView.vue looks like:
Phew! That might be a bit lengthy, but the crucial sections of the code are minimal. They mainly consist of the content within script tag and the form in the HTML template. The rest, like the SVG elements, serves more for aesthetic purposes, enhancing the visual appeal of the UI as shown below:
The HTML form presented here includes three inputs: one for email and two for passwords, along with the signup button. The values of these inputs are bound to properties of a reactive object named userForm. Validation rules are also established using userFormValidationRules, specifying that all fields are required, the email must be a valid email format, and the confirmation password should match the entered password. The v$ is utilized to check the validation state.
When the signup button is clicked, the system first checks the validation state. If there are no validation errors, it proceeds to execute the registerUser action defined in our userStore. If everything proceeds without issues, and the registerUser action resolves with a user object, we direct the router to navigate to the home view, indicating that the user has been successfully created and authenticated.
Now, you might be wondering about scenarios where the user already has login credentials and doesn't wish to sign up again. To address this let's also
code the Sign-in view. Here is what my code for LoginView.vue looks like.
.png)
Similar to the signup view, although the code may be longer, the critical sections lie within the script tag and the form. The remaining elements serve cosmetic purposes, enhancing the visual appeal of the UI, as illustrated below:

In this HTML form, there are two inputs and a sign-in button. As you've observed, the input fields are bind to the reactive variables email and password. When a user clicks the sign-in button, it triggers the signIn function, within which we invoke the loginUser action defined in our userStore. If the promise returned by loginUser resolves successfully, we instruct the router to navigate to the home path, indicating that the user has successfully authenticated.
This essentially covers our authentication process in this demonstration. It required more writing and explanation than initially anticipated, and we haven't even delved into the exciting realm of audio and video, which we'll explore in the next section. As previously mentioned, my goal was to offer a thorough account of each step involved in creating the entire project, covering aspects such as authentication, to ensure you gain a comprehensive understanding of the entire process.
Agora.io - Audio/Video
Now, let's direct our focus to the audio and video channels/rooms for the project. In this aspect, we'll be utilizing agora.io. It's worth mentioning that ClubHouse also utilizes agora.io, as discussed in my previous blog posts. For those familiar with my earlier blog posts, agora is a known entity. If we had planned to build this feature from the ground up, it's essential to note that integrating video streaming features into an application can be a tedious and time-consuming task. Managing a low-latency video server, load balancing, and handling end-user events (such as screen off, reload, etc.) can be challenging. This is not to mention the complexity of ensuring cross-platform compatibility. Furthermore, opting for agora.io aligns with our project's principle of creating a completely serverless application. Given this, using a service like Agora seems to be the most suitable option, as we intended to avoid reinventing the wheel from scratch.
Below is the basic workflow for agora video sdk:

The essential points derived from the above diagram highlight that, to initiate a session with Agora, we should implement the following steps in our app:
- Retrieve a token: A token is a computer-generated string used to authenticate a user when they join a channel. In this demonstration, I will illustrate how to set up a basic Express server for token management and how you can utilize a temporary token generated from the Agora Developer Console.
In a production environment, it is recommended to implement your token provider. If you are opting for a serverless solution following our project guidelines, it is advisable to use Firebase Functions. - Join a channel: Utilize methods to create and join a channel, ensuring that apps using the same channel name join the same channel.
- Send and receive video and audio in the channel: All users in the channel send and receive video and audio streams from one another.
Now that we have a fundamental understanding of the steps to connect to Agora, lets create an application within agora console and collect the necessary required details for our application to connect to agora services.
Upon completing the sign-up process, you will be directed to the Agora Console.
Navigate to the Project Management tab within the Agora Console. In this section, you will find a list of all your projects, allowing you to easily access the AppID of an existing project or create a new one.
To initiate a new project and generate a fresh AppID, click the "Create" button located in the upper left section of the screen.
In the dialog box, you'll be prompted to input the Project Name and choose your Authentication Mechanism.

The choices in the "Authentication Mechanism" hold crucial significance, as your decision will either integrate the recommended security layer necessary for running your app in environments beyond its initial "Proof of Concept" stage or omit additional security measures.
The second option is offered to simplify testing Agora or creating an initial "Proof of Concept" app. Nevertheless, as you progress beyond the testing phase, Agora highly advises enabling Token Authentication for heightened security.
Choose the first option from the given, even though our project is a proof of concept. Once you hit on submit, it’ll create a new project and you should see it on the Project Management Console.
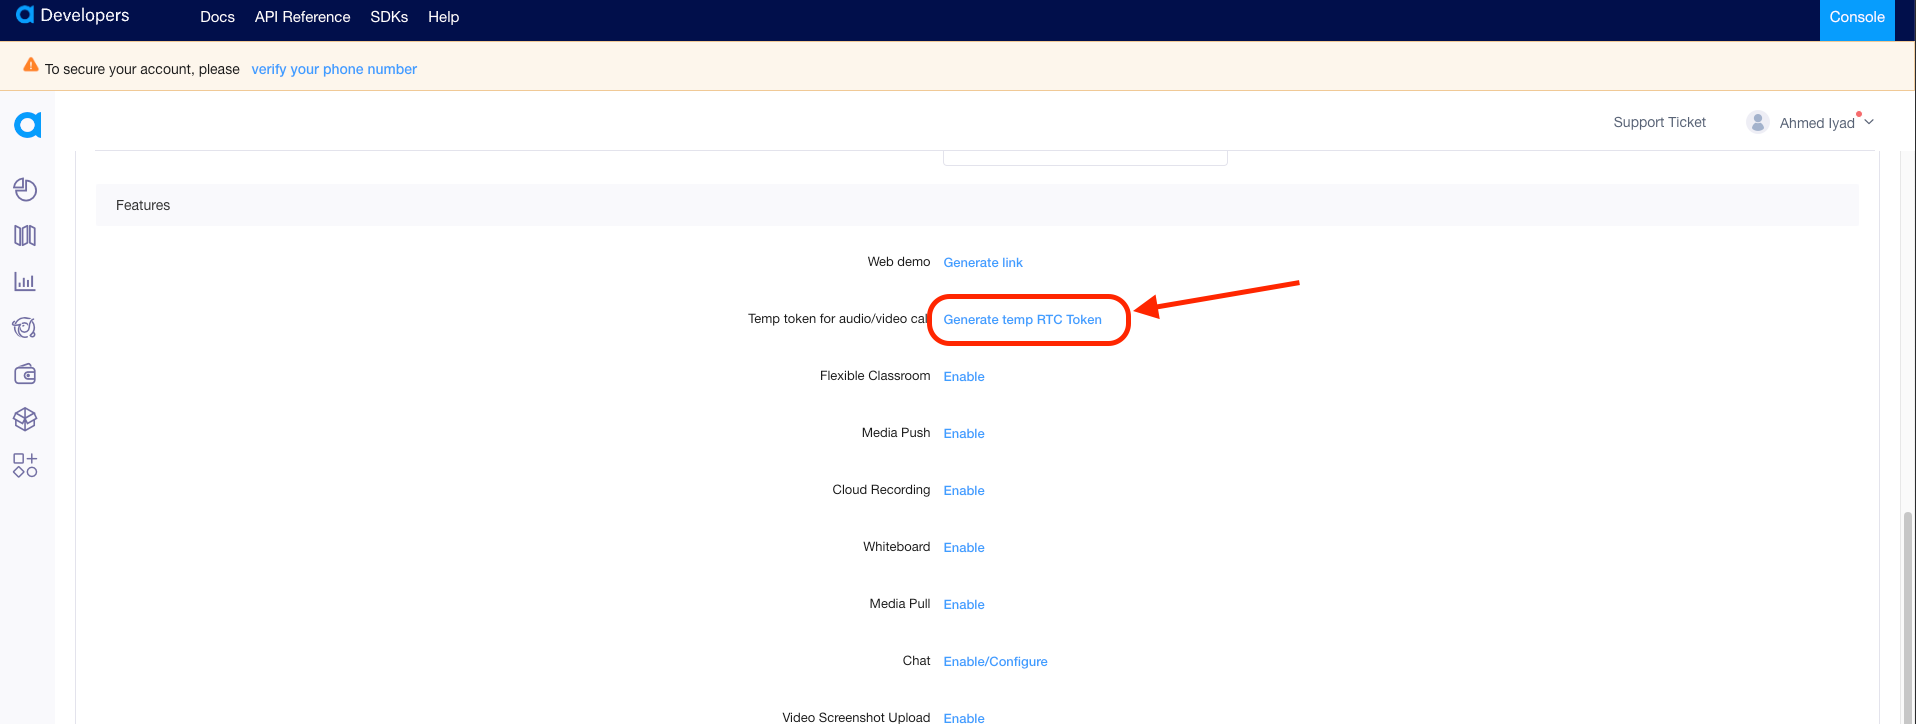
Now, click on the copy icon near the app ID to reveal it and copy that app ID. We’ll need this ID later at the coding phase, next press configure
On the configuration screen under Features, click on "Generate Temporary Video SDK Token."
Provide a channel name of your preference and click on "Generate."

This will produce a token that is exclusively valid for the specified channel. If you have a server for token management, you should be able to generate tokens for joining or creating channels. For our project, we'll be utilizing the temporarily generated token from the console (make sure to copy and save it securely as we'll need it later).
Despite our preference for a serverless solution, let me walk you through the steps of establishing a basic Express server using Node.js for effective token management. While I initially suggested utilizing Firebase functions for this task, it's crucial to acknowledge that Firebase doesn't offer Firebase functions on free-tier developer accounts. Regrettably, I couldn't conduct testing specifically for this purpose, and I am cautious about sharing code that hasn't undergone thorough testing and verification. Consequently, I will demonstrate how to achieve the same functionality on an Express js server, and you can easily adapt it to Firebase functions. Regardless of the chosen approach, my primary goal is to illustrate the implementation for generating tokens, whether it be for creating or joining an existing channel.
Sample Token Server:
To create the token server in a new terminal, execute npm init to initialize the Node project. The project creation prompt will be displayed. I opted for the default settings, but feel free to customize this section as needed.
Now that the project is created, we can incorporate our NPM dependencies (express and agora-token) by executing the following commands:
Having configured the project, open the folder in your chosen code editor. Upon reviewing the package.json file, you'll observe that the entry file is specified as index.js. Nevertheless, this file is currently not present in our project, so we must create it within our project directory. Here is the corresponding
code:
In the index.js, we initiated by importing our modules. We require the Express object from Express, and from agora-token, we had obtained references to the RtcTokenBuilder and RtcRole. Additionally, we are utilizing dotenv for managing our environment variables.
Here is the structure of my environmental variables in the .env file:
.png)
You can retrieve the APP ID and APP Certificate from the Agora Console, and the PORT specifies the specific port on which our Express web server will operate.
Following that, we defined our app constant, instantiating our Express object for streamlined server configuration.
Next, we established the functions triggered when the endpoint is accessed. The initial function, nocache, configures response headers to ensure the browser avoids caching the response, guaranteeing a consistent receipt of a fresh token. It's crucial to note that we invoke the next() method at the end of this function. As the first in the series and a middleware function, calling next() directs Express to proceed to the subsequent function.
The second function, generateRTCToken, manages the request and provides the JSON response. We initiate this function by configuring the response header to prevent potential CORS issues. Subsequently, we check for the channel's presence in the request parameters it received. As a mandatory parameter, if channelName is undefined, we must return an error with a 500 response code and a JSON object containing the error. Similar checks are applied to uid and role. Additionally, the user can optionally provide an expiry query parameter to determine the token's expiration time. We retrieve and verify its existence; otherwise, we set a suitable default of 3600 seconds.
Having assembled all the components for our token, we are now ready to use the RtcTokenBuilder object to generate the token. We inspect the tokenType and invoke the corresponding method on the object, providing the necessary values and return this token as a JSON response.
Moving forward in our code, we defined a GET endpoint /rtc, incorporating the nocache and generateRTCToken functions. You'll notice the route contains :<path>. The colon (:) designates the path as a variable, allowing users to pass in values such as channel name, user role, token type, and user UID to the route. We can access this data in our application.
As the last step in creating our Express server, we implemented the listen() method and pass in the port and a callback once the server is ready and listening on the given port.
Now, navigate to your package.json file and include a start command within the scripts object. This start command should execute the "node index.js" command, enabling the initiation of our server instance.
.png)
To initiate the server, you can execute the command `npm start` in the terminal. Once the server instance is operational, you'll observe the message "Listening on port: 8080" (or the port specified in your .env file) in the terminal window.
To generate tokens, you can send GET requests to the server using the path `/rtc`. For example, to test, open your browser and navigate to: http://localhost:8080/rtc/test/publisher/uid/1
In this request, we pass "test" as the channel, "publisher" as the role, and "uid" as the tokenType, with the UID set to "1".
It should return a response as below with token:
After exploring the functionalities of tokens, I hope you now feel comfortable with this phase of the project. Before we shift our attention to the user interface encountered after authentication, let's optionally create the function that we'll utilize to call the token server for generating tokens if you prefer using a token server instead of the tokens generated from the Agora console.
To begin, let's create a file named "agoraToken.js" in the "utils" sub directory of the "src" directory in our project. Assuming you are following my approach of using an Express server, we will also install a library called Axios to handle the HTTP requests to the Express server. You can do this by executing the following command:
This is the structure of my
code within agoraToken.js:
As you can observe in this code, I'm importing a few environmental variables. I prefer to keep API tokens and credentials separate from my codebase. You might notice that I didn't follow the same approach for the Firebase config. This is because, according to a
Firebase team engineer, the Firebase API key solely identifies your project with Google’s servers and is not considered a security risk if exposed. With that clarification, here is the structure of my .env file:
.png)
Within the agoraToken.js code, we exported a function called genToken. This function yields a new promise that executes a GET request to our Express server. It takes two parameters: joinType, indicating whether the user intends to join or create a channel, and joinRoomName, specifying the channel's name for joining or creation.
The user role link parameter is determined by the joinType. If the user is creating a room, their role is defined as a publisher. On the other hand, if the user is joining a room, they take on the role of an audience member. Furthermore, the UID is established by retrieving it from the userStore. It's important to highlight that setting the UID to 0 enables the token returned by our token server to be valid for any user. Conversely, specifying a particular UID restricts the usability of the resulting token exclusively to that designated user.
Upon a successful response from the GET request, we update the rtcToken state of the userStore with the token obtained from the Express server. Additionally, the joinChannel state of the userStore is set with the channel name used for token generation, and the genToken function resolves with a true state. Conversely, if an error occurs, the function rejects, providing details retrieved from the Express server via Axios.
Now, let's shift our focus to the interface presented to the user upon successful authentication in our application. This interface includes a form featuring an input for the user to indicate their preferred room and buttons that enable them to either join or create this room. This is the layout of my design:
For this purpose in my project, I employed HomeView.vue, and the relevant
code is outlined below. (During the project initiation, Vite would have inserted template content into HomeView.vue; you can substitute that content with the code I provided):
Just like the sign-up and sign-in views, the crucial codes are located within the script tag and the form. Additionally, you may have observed that I've incorporated heroicons from Tailwind. In my opinion, they provide a cleaner aesthetic compared to other icon libraries like the materials library. To integrate heroicons, you can use the command "npm install @heroicons/vue". It's important to note that, aside from the sections not explicitly mentioned, these elements primarily contribute to the cosmetic enhancements aimed at making the user interface more visually appealing.
The form incorporates an input box bound to the reactive variable joinRoomName, and the buttons "Join" and "Create" call the function triggerGenToken, triggering it with the respective joinType. This function, in turn, calls the previously exported genToken from agoraToken.js. If genToken resolves successfully, we then instruct the router to navigate to the rooms view.
Alternatively, if you prefer to use the token generated by the Agora console instead of managing tokens through our own server, within this function, you can simply update the rtcToken state of the userStore with the Agora console token and the joinChannel state of the userStore with the value from joinRoomName. Subsequently, instruct the router to navigate to the rooms view. The drawback in this case is that you must ensure the room name you provided in the Agora console while generating the token matches the joinRoomName value for the rest of the application to function correctly. This is the reason why I made an effort to showcase both methods despite the initial guidelines we established for a complete serverless solution.
Now, let's explore the rooms view, an exciting section where we'll connect to agora.io, providing users with a channel for virtual face-to-face communication via video. For those who prefer a more reserved approach, there's also the option to participate in the call with audio only.
.png)
.png)
In essence, this view is divided into three main sections. At the screen's top, a navigation bar showcases the current room name along with functional buttons for camera control, microphone adjustment, leaving the room, viewing attendees/participants in the current room, and signing out. The view's body incorporates an unordered list formatted as a grid, presenting video feeds from users who have activated their cameras (initially, when a user joins a room, both their camera and microphone are inactive). Additionally, there's a slide-over that features another unordered list displaying all participants in the room.
Before commencing the coding for this view, let's install the agora-video-sdk by executing the following command in the terminal:
To facilitate the implementation of the slide-over, I opted for headless-ui by Tailwind. To integrate this library into your project, you can use the command "npm install @headlessui/vue."
Now, let's examine the
code for this particular section.
.png "https://gist.github.com/eyaadh/d096e0568cd3fbd34f4e2429da4ff983")
As seen in the codebase, upon the view's mounting, the joinChannel function is called. Initially, this function checks whether the channelToJoin state of the userStore is null. If it is, a default value is set to avoid potential complications. Additionally, it verifies if the reactive variable isJoined is true, indicating that a user is actively in a channel. If isJoined is true, it invokes the leaveChannel function to gracefully exit the current channel and prepares to join the newly provided channel.
Subsequently, the function checks if the client object has been initiated. If not, it creates the client object by assigning the client variable with the createClient method of the AgoraRTC library. Following this, we employee a few event listeners:
- user-published: Triggered when a remote user activates their microphone or camera, publishing an audio or video track. Upon this event, the onUserPublished function is called, taking two arguments: the user object and the media type. Within this function, based on the media type, we subscribe to the video, enabling it to be displayed in our grid on the body. The grid, implemented as a v-for loop, iterates through the reactive array of people, generating video elements with the element ID as the corresponding user's UID. Once subscribed, the Agora Video SDK scans the DOM, locates the element with the UID, and publishes the subscribed media on that specific element.
- user-unpublished: Triggered when a user turns off their microphone or camera, the `user-unpublished` event prompts the execution of the onUserUnpublished function. Agora Video SDK efficiently manages media unsubscription, eliminating the need for explicit control over video elements. We streamline the process by removing the user object from our people array, automatically resulting in the removal of its corresponding element from the grid.
- user-joined: This event is triggered when a remote user or host joins the channel. Upon this event, we push the user object to the reactive variable attendees, an array of user objects used to populate the list of users on the slide-over.
- user-left: Triggered when a remote user goes offline or leaves the channel. Upon this event, we remove the user object from the attendees reactive array, ensuring that the list of attendees on the slide-over is updated accordingly.
Subsequently, the join method of the client is called with the arguments: app ID, channel name, RTC token, and UID. Following this, the reactive variable isJoined is set to true, indicating that the client is currently in an active session.
Pressing the camera toggle button triggers the toggleCamera function. Initially, this function toggles the values of variables: isVideoOn and isVideoPubed, indicating whether the user's camera is on and published. If the camera is on, the function proceeds to register a local track and publish its content to remote.
To achieve this, it checks if the local track is not null and invokes the setEnabled method on the local track with an appropriate boolean value to toggle publishing the track if the local track is already published. Following this, a reference to the track containing the video captured by the camera is established and played on the corresponding DOM element with the ID "camera-video."
Within the same function, we also verify the variable isJoined to determine if the user is actively in a room. If so, we publish the track to remote, allowing others to subscribe and view the content.
Upon pressing the microphone toggle button, the toggleMicrophone function is activated. This function operates in a manner similar to the toggleCamera function. The distinctions lie in updating the variables isAudioOn and isAudioPubed, indicating whether the user's microphone is on and published. Additionally, it involves invoking setEnabled on the audio track to toggle publishing the track and creating a reference with createMicrophoneAudioTrack. This reference is used to register the audio track locally and publish it when actively participating in a room.
Finally, pressing the leave channel button triggers the leaveChannel function. This function resets all the indicative variables to their default values; isJoined, isAudioPubed, isVideoPubed, and isVideoSubed are set to false, while attendees and people are reset to empty arrays. Additionally, it calls the leave method on the client. Following this, we instruct the router to navigate to the home view, providing the user with the option to join a new channel or create a new one, as outlined in our workflow.
That concludes the app and the coding required to implement our workflow. As you may have observed, it's not as challenging as it may sound when the right tools are employed. While there is certainly room for improvement, the current state serves as a sufficient proof of concept. Now, let's explore how we can generate native app for Android from this same source code without the need for extensive and tedious coding.
Mobile App - Android
To generate the Android App, we will be using
Capacitor JS by IONIC. To compile APK and publish the bundle to the Google Play Store, you'll require Android Studio. Capacitor is a versatile cross-platform native runtime that simplifies the process of building high-performance mobile applications. Capacitor offers a uniform set of web-focused APIs, allowing applications to adhere closely to web standards while accessing robust native device features on supported platforms. If a feature works in the browser, chances are it will work seamlessly in a mobile app built with Capacitor. The integration of native functionality is made simple through a Plugin API designed for Swift on iOS, Java on Android, and JavaScript for the web.
Now, you might be curious as to why we're focusing solely on an Android app and not iOS. Initially, my intention was to generate both native apps, but I encountered a limitation because Firebase in this context is not supported on iOS. To address this, we need to install a Capacitor plugin called `@awesome-cordova-plugins/firebase-authentication`, which would necessitate substantial adjustments to the code base. This topic deserves a tutorial of its own. Consequently, we'll conclude this demonstration with only an Android app for the native environment. iOS users can still access our web version at this stage which is responsive and works fluently on Safari.
To begin, we'll install Capacitor's primary npm dependencies: the core JavaScript runtime and the command line interface (CLI):
Proceed by initializing Capacitor using the CLI questionnaire with the command `npx cap init`. The CLI will prompt you with a series of questions, beginning with your app name and the package ID you wish to assign to your app. Below are the values I provided:

After the Capacitor core runtime is installed, you can install the Android platform by issuing the following command:
After the platforms have been added to your package.json, you can execute the following commands to generate your Android project for the native application.
.png)
Once you've established the native project, you can synchronize the web application with the native project by running the following command. This process entails copying our built web application, typically situated in the dist directory by default, to our native project and installing the necessary dependencies for the native projects.
To open the Android project using Android Studio, execute the command `npx cap open android`, and it will launch Android Studio:
Conclusion:
The mobile app integration seamlessly aligned with our web app template, as we ensured its responsiveness and mobile-friendly design during the web app template creation. Consequently, we didn't need to make any adjustments to the template for a mobile view. This aligns with my recent approach to building native apps, where I maintain the source code for the web app only, eliminating the need for separate projects for native apps. Capacitor proves handy for generating native apps from the web app source code. However, occasional limitations may arise, as exemplified by the challenge faced in implementing the iOS native app. Nevertheless, most limitations come with workarounds.
For those who haven't been coding along, you can find the link to the entire project
here.
Did I manage to complete this project within a week?
Regrettably, it took a bit longer than anticipated, but it was undeniably an enjoyable project. The programming itself took around four days, during which I familiarized myself with the Agora Web SDK and its functionalities. Writing and compiling this post took an additional five days to complete the entire project.
So, what's next for the application?
My current task is fulfilled; the goal was to present a proof of concept, elucidating the entire process and the libraries employed, sharing as many details as possible, and educating you on the topic. I believe I've achieved that. In this demonstration, we essentially built the foundational functionalities for the application. You can elevate it further by implementing in-room chats and numerous other functionalities, which are virtually limitless in today's tech landscape.


.png "https://gist.github.com/eyaadh/a0e46e309ef20a1aec502c27538feda3")
.png)
.png "https://gist.github.com/eyaadh/05d36d2b1cae9105e6daed207812cdd1")
.png "https://gist.github.com/eyaadh/3318b6c5bcb43950b873240764f1eab4")
.png)
.png "https://gist.github.com/eyaadh/f92c544c8080dd8a79ef5d32ebcd7b66")
.png)


.png)
.png "https://gist.github.com/eyaadh/82905e522c909c7be090cd2bd81c3316")
.png)
.png)
.png)
.png)
.png "https://gist.github.com/eyaadh/84ea345fb4708515952d0fb562da1cad")
.png)

.png "https://gist.github.com/eyaadh/369a9eed6e2af62d73c68e352a639418")
.png)
.png)
.png)
.png)

.png)
.png)
.png)

.png)

